|
Creating engaging videos involves more than just capturing compelling footage; it also requires thoughtful editing techniques to enhance storytelling and maintain audience interest. One of the most crucial aspects of editing is mastering different types of cuts and transitions. Let's delve into five key techniques that can elevate your video content: Clean Cut, Jump Cut, J-Cut, L Cut, and Cut on Action.
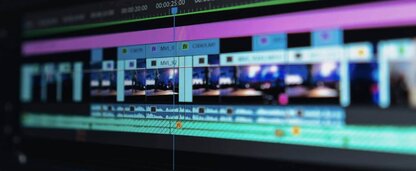
CLEAN CUT: The clean cut is the simplest and most seamless transition between two clips. It involves ending one clip abruptly and starting the next one immediately afterward. This type of cut is often used for straightforward transitions between scenes or shots that flow logically without the need for any visual effects or transitions. A great example of a CLEAN CUT is in THE BEAR clip below at 1:10 to 1:11 -- We see Sydney walking towards the office from behind and we cut to her walking into the office from the front. It doesn't jump time- it's the natural flow of the action.
JUMP CUT: A jump cut is a deliberate editing technique where the action seems to abruptly transition from one point to another within the same scene. This edit can evoke a sense of urgency or excitement, which is why it's often favored in vlogs, interviews, and fast-paced montages. However, it's crucial to use jump cuts sparingly to prevent disorienting the viewer. In our clip featuring Sydney preparing an omelette, you can spot numerous instances of jump cuts. From the moment she grabs the eggs, cracks them on the counter, to putting them in the bowl, three examples of jump cuts immediately catch the eye.
J-CUT: The J-cut is a technique where the audio from the next scene begins before the video changes. This creates a smooth transition between scenes and helps maintain continuity and flow in the narrative. J-cuts are commonly used in dialogue-heavy scenes or when transitioning between different locations or perspectives. The clip from Charlie Wilson's War demonstrates the J-CUT nicely at 0:18 when we hear Philip Seymour Hoffman's voice before we see him.
L Cut: Conversely, an L-cut occurs when the audio from the previous scene continues to play over the beginning of the next scene, while the video changes. This technique helps to maintain the rhythm of the dialogue or background music, providing a natural transition between scenes and enhancing the overall cohesion of the video. The top of the clip below is an excellent example of an L-CUT at 0:04- Here we cut to the outside of a house yet keep hearing the teacher's voice over and over.
CUT ON ACTION: Cutting on action involves transitioning between two shots at the precise moment when the action in the first shot is continued or completed in the second shot. This technique maintains the momentum of the scene and creates a seamless flow of movement, keeping viewers engaged and immersed in the action. It's one of the most, if not the most, editing cuts used in film and television. I bet you will now notice it a lot when you are watching your favourite show or film. As an editor it is one of the ones I get the most satisfaction out of doing well! In the Kill Bill Clip, the first easy to see cut on action is at 0:06 when we cut to the Samurai with white hair. He is already in the motion of standing when we cut to him. A second earlier or later would make a big difference in the feel of the scene.
Incorporating these various cuts and transitions into your editing repertoire allows you to craft dynamic and visually compelling videos that captivate your audience from start to finish. However, it's essential to exercise restraint and discretion when choosing which techniques to employ, ensuring that each cut serves the narrative purpose and enhances the overall viewing experience.
The Art of editing is knowing when to use the correct tool. Ultimately, mastering the art of editing requires practice, experimentation, and a keen eye for detail. By harnessing the power of different cuts and transitions, you can transform ordinary footage into extraordinary visual storytelling that leaves a lasting impression on your audience.
0 Comments
At Moxie Productions, we believe in staying at the forefront of industry trends to deliver innovative and impactful videos for our clients. In the evolving landscape of video production, we're strategically integrating several key trends to enhance our creative approach and maintain our position as a forward-thinking agency. 1. Short-Form Video Dominance:
 2. Sustainability-Focused Content:
 3. Cinematic Branding:
 4. Diversity and Inclusion:
 In embracing these trends, we're not just creating videos; we're crafting experiences that resonate with a broad and engaged audience. Moxie Productions is your partner in unlocking creativity and ensuring your story stands out in the dynamic world of video content. Join us on this exciting journey where innovation meets impact.
As the leaves turn vibrant shades of red and gold and the air becomes crisp with the promise of winter, it's clear that fall is here and the holiday season is just around the corner. At Moxie Productions, we believe that this time of year is perfect for embracing the power of video to add that extra sparkle to your holidays. Let's explore how videos can make your celebrations even more special and memorable. 1. Share the Joy: Fall and the holiday season are all about connecting with loved ones. Whether it's a family gathering, a cozy evening with friends, or a corporate event, videos are a fantastic way to capture and share the joy of these moments. Our video production services can help you preserve these memories, making it easy to revisit the laughter, conversations, and warm feelings that define this season.  Image by pch.vector</a> on Freepik 2. Spread the Cheer: As the world gets busier, it's not always possible for everyone to be present at your holiday gatherings. Videos offer a heartwarming solution. We can create personalized video messages that can be shared with family members or friends who can't attend in person, bringing the holiday spirit directly to them. It's a thoughtful gesture that bridges the distance and keeps everyone connected.  Creator: sabelskaya | Credit: Getty Images/iStockphoto 3. Memorable Corporate Gifts: For businesses, the holiday season presents an excellent opportunity to express gratitude to clients, employees, and partners. Custom-made videos can be a unique and memorable corporate gift. Show your appreciation, share your company's journey over the past year, or highlight your future plans. Our team can help you craft a video that's both personal and professional.  https://scatchy.art/digital-artist-gadgets-in-2022/ 4. Show Your Gratitude: The holiday season is all about giving and sharing. Create a video to express your gratitude. Whether you want to thank your employees for their hard work, your customers for their loyalty, or your followers for their support, a heartfelt video is a meaningful way to do it.  Creator: Kumer | Credit: Getty Images/iStockphoto At Moxie Productions, we're here to help you make the most of this special season. Our experienced team can bring your video ideas to life, ensuring that your fall and holiday season celebrations are filled with warmth, connection, and joy.
So, this season, let the magic of video transform your fall and holiday experiences. Get in touch with us to explore the possibilities. Whether you're looking to capture special moments, promote your brand, or simply spread some holiday cheer, we've got the expertise to make it happen. Happy holidays! As the sun sets on summer and the crisp air of fall begins to sweep in, it's the perfect time to start thinking about your upcoming video production needs for the fall and winter seasons. The changing scenery and the anticipation of seasonal festivities offer an excellent opportunity to craft engaging visual narratives that captivate your audience's attention. Let's delve into what you should consider as you prepare for your fall/winter 2023-2024 video projects. **1. Capture the Autumn Ambiance: Fall is a season filled with vibrant colors, cozy atmospheres, and a sense of change in the air. It's a fantastic opportunity to create visually captivating videos that reflect the essence of the season. Whether you're in the fashion industry, food and beverage sector, or any other field, consider how you can incorporate the fall aesthetic into your video content.  **2. Holiday Promotions and Messaging: With fall comes the anticipation of holidays, from Thanksgiving and Halloween to the winter festivities. It's essential to plan ahead for any holiday-themed videos you want to produce. Whether you're offering special promotions, sharing heartfelt holiday messages, or showcasing festive products, early planning ensures you're ready to launch your content at the right time.  **3. Highlight Seasonal Products or Services: For businesses that experience seasonal fluctuations, fall is the perfect time to spotlight products or services that are in high demand during this period. Create videos that showcase how your offerings fit seamlessly into your customers' fall and winter routines. From cozy clothing collections to warm beverages or home decor, let your video convey why your products or services are a must-have this season.  **4. Tell Emotional Stories: Fall and winter are synonymous with emotions, from nostalgia to togetherness and even anticipation. Utilize this time to tell stories that resonate on a deeper level. Whether it's a heartfelt narrative of gratitude or a heartwarming community-focused story, well-crafted storytelling can leave a lasting impact on your audience.  **5. Adapt to the Changing Environment: Fall and winter bring changes not only in visuals but also in the environment. Consider how the lighting, weather, and overall atmosphere will affect your video shoots. If you're planning outdoor shoots, take advantage of the picturesque scenery, and ensure you have contingency plans for any weather-related challenges.  **6. Plan Ahead for Distribution: Creating compelling videos is just one part of the equation; ensuring they reach your target audience is equally important. Develop a strategy for how and where you'll distribute your fall and winter videos. This could include social media platforms, your website, email campaigns, and even collaborations with influencers or partners.  The fall and winter seasons are more than just a time of the year; they're an opportunity to craft stories that touch hearts and inspire action. As the leaves begin to fall and the air turns crisper, let the beauty of the changing seasons spark your creativity. Whether you're looking to capture the essence of your brand, share touching narratives, or showcase seasonal offerings, your video content can truly shine during this time.
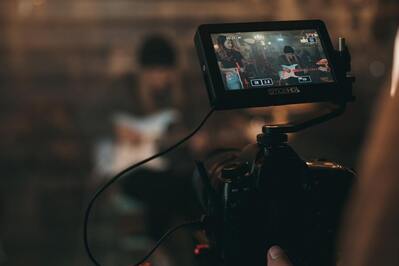
So, as the world transforms around us, take a moment to reflect on the unique stories you could tell through the lens of video. Whether you're preparing to partner with a production company or embarking on an independent creative journey, the fall and winter seasons invite you to explore new possibilities, embrace authenticity, and connect with your audience in ways that resonate deeply. Your journey into the world of visual storytelling awaits—what story will you tell next?  Capturing the attention of your audience is crucial when it comes to creating promotional videos. One effective way to do this is by incorporating different camera techniques that add visual depth and interest to your videos. These techniques not only make your videos more visually appealing, but they also help convey your message more effectively. In this blog, we will explore the benefits of using different camera techniques to add visual depth and interest in your videos. I highly recommend eyecandyy.com for amazing visual reference for over 20 camera movements and other visual techniques. DEPTH OF FIELD  By manipulating the depth of field, you can create a visual separation between the subject and the background, adding depth to your videos. This technique involves keeping the subject in sharp focus while blurring the background or foreground. This draws the viewer's attention to the subject, making it stand out and creating a professional look. A shallow depth of field can be achieved by using a lens with a wide aperture, such as a prime lens, and positioning the subject at an appropriate distance from the background. This technique is commonly used in product videos, interviews, and testimonials to highlight the main subject or subject's emotions. ANGLES and PERSPECTIVES Another effective way to add visual interest to your videos is by using different camera angles and perspectives. Experimenting with various camera angles, such as high angles, low angles, and Dutch angles, can create a unique and dynamic visual experience for your viewers. High angles can make the subject appear smaller, while low angles can make them look more dominant or powerful. Dutch angles, where the camera is tilted to one side, can add a sense of unease or tension. These techniques can be used strategically to enhance the mood or convey a specific message in your videos. MOVEMENT and TRACKING SHOTS 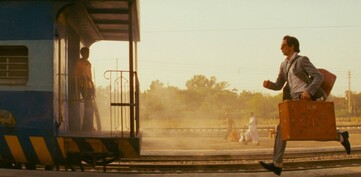 Adding movement to your videos can make them more engaging and dynamic. Techniques such as panning, tilting, and tracking shots can create a sense of motion and energy. Panning involves moving the camera from side to side, while tilting involves moving the camera up or down. Tracking shots involve following a subject's movement, either with the camera on a dolly or using a handheld stabilizer. These techniques can be used to capture action shots, show a product in use, or follow a subject's movement, adding visual interest to your videos. FRAMING and COMPOSITION
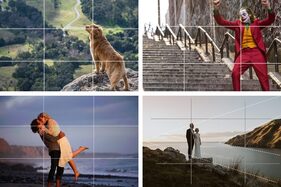
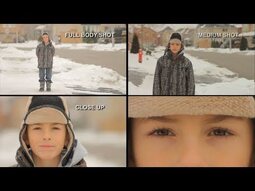
Framing and composition are essential elements in video production that can greatly impact the visual appeal of your videos. Consider the rule of thirds, which involves dividing the frame into a 3x3 grid and placing the main subject along the lines or at the intersection points. This creates a visually pleasing composition that draws the viewer's eye to the subject. You can also experiment with different framing techniques, such as close-ups, medium shots, and wide shots, to convey different emotions and tell a compelling story. Proper framing and composition can add visual depth and interest to your videos, making them more visually appealing and engaging. LIGHTING  As mentioned in previous MOXIE Blogs, lighting is a crucial factor in videography that can greatly affect the visual depth and interest of your videos. Experimenting with different lighting techniques, such as three-point lighting, can create depth and dimension in your videos. Three-point lighting involves using a key light to illuminate the main subject, a fill light to balance the shadows, and a backlight to separate the subject from the background. This creates a more three-dimensional look, adding visual interest to your videos. You can also experiment with different color temperatures and lighting styles to create a specific mood or atmosphere that complements your promotional message. 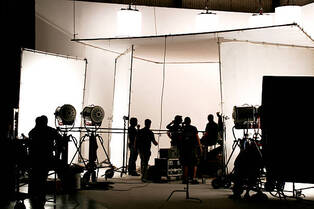 Using different camera techniques in your videos can greatly enhance their visual appeal and make them more engaging to your audience. Experimenting with depth of field, angles and perspectives, movement and tracking shots, framing and composition, and lighting can add visual depth and interest, making your videos more visually appealing and effective in conveying your message or story to your targeted audience.  Video content is becoming increasingly popular, and with the rise of social media platforms like TikTok, Instagram Reels, and YouTube, there are endless possibilities for creating engaging video content. However, coming up with creative video ideas can be a daunting task, especially if you're not sure where to start. In this post, we will explore some tips for brainstorming creative video ideas that will help you come up with more unique and engaging concepts.  1- START with a clear GOAL /CONCEPT Before you begin brainstorming, it's important to have a clear understanding of your video's purpose and intended audience. What message do you want to convey? Who is your target audience? Is there a topic you want to cover, or a particular event you want to showcase, or even a specific emotion or feeling you want to evoke. Once you have a starting point, you can begin to brainstorm ideas that fit within that theme or concept. Understanding your goals will help guide your brainstorming and ensure that your video is effective in achieving your objectives.  2- COLLABORATE with a TEAM Brainstorming with a team can be a great way to generate creative video ideas. When you work with others, you can bounce ideas off each other and build on each other's concepts. Consider inviting team members with diverse backgrounds, perspectives, and skill sets to ensure a wide range of ideas are generated.  3- SET aside time for BRAINSTORMING It's important to set aside dedicated time for brainstorming creative video ideas. This could be a weekly or monthly meeting where team members come together to brainstorm ideas, or it could be a personal brainstorming session where you sit down and jot down ideas on your own. By setting aside time for brainstorming, you can ensure that you are giving your creative process the attention and focus it deserves.  4- START brainstorming session with IMPROV GAMES Nothing gets the creative juices flowing more than improv games! And they do double duty as great team building exercises. There are so many great improv games available and many great improv companies to hire if you were wanting to have guided sessions. Theatrefolk has a great article on a number fun and creative improv games. 5- LEVERAGE your interests or HOBBIES The first step is to identify your interests and hobbies. Once you have done that you can brainstorm video ideas that showcase your skills and expertise. For example, if you love cooking, you could create a video that shows you preparing a meal while talking about your business, or if you like hiking, you can go on hikes as you discuss your service. Of course, you must make sure your video is professional and that it reflects your brand's values and messaging. Creating engaging and entertaining videos can seem like a daunting task. Brainstorming can help reduce the work and actually be a fun and rewarding process. By starting with a theme or concept, collaborating with a team, setting aside time for brainstorming, using exercises to get the creative juices flowing, and leveraging your interests and hobbies, you can come up with more unique and engaging video concepts. Remember, the key to success is to keep an open mind and have fun with the creative process!   As a client, when you work with a video production company like Moxie Productions you can expect a high level or professionalism and expertise in the field of video production. In this blog we will cover 4 of the essential qualities a client can expect from a professional video production company.  1- CLEAR COMMUNICATION As a client you can expect clear and consistent communication throughout the project, including regular updates and any necessary adjustments. Beginning with the initial meeting, you should feel heard, your vision/message understood and you should feel listened to. Therefore, you can expect the company to be responsive to your inquiries and concerns at all stages of the project. Whether you have questions about the project timeline, budget or any other aspect of the process, the video production company should be able to provide clear and timely answers. In addition to keeping you informed, you can expect the company to be pro-active in communicating with you. They should let you know if there are any potential issues or roadblocks that could impact the project, and work with you to find solutions. Clear and concise communication is essential for the success of any project. By working with a professional video production company, you can expect a high level of transparency and responsiveness throughout the process  2- TECHNICAL EXPERTISE As a client one of the key things you can expect from a video production company like Moxie Productions is technical expertise in the field. This includes a deep understanding of various technical aspects of video production, such as lighting, audio and camera work. A professional video production company, when it comes to lighting, will be able to create the right ambience and mood for your video. They will be able to use lighting to highlight key elements and draw the viewer's attention to certain aspects of the video. They will also be able to work with natural light to create a realistic and visually appealing look. Nothing makes a video look more unprofessional than bad audio quality. A professional video production company will have strong understanding of how to capture and edit audio. This includes being able to choose the right microphones for the job and ensuring that the audio is clear and free from background noise. And of course camera work is a crucial element of a professional looking video. A professional company will have experienced and skilled camera operators who can capture high-quality footage. They will be able to use different camera angles and movements to create visual interest and tell the story effectively. Pulling this all together is a professional video editor who understands your message and has the expertise to assemble the footage in the most creative and interesting fashion that ensures your vision/message is well represented. In addition to their expertise, a professional company will be able to guide you through the production process. They will be able to explain the different stages of the process to help you understand what is involved. This includes pre-production, where the concept is developed and the plan is put in place; production, where the video is actually shot; and post-production, where the footage is edited and polished into the final product.  3- CREATIVE SKILLS When it comes to creating a successful video, creative skills are just as important as technical skill. A professional video production company like Moxie Productions will be able to help you conceptualize and develop a compelling video that effectively tells your story. One of the most important creative skills a company has is the ability to understand your vision and goals for the video. These goals should be discussed in the initial meeting and should be the defining factor as to which video production company you choose to work with. It's imperative that the client and production company see eye to eye on the visual look and feel of the videos. A professional company will be able to ask you questions to get a clear sense of what you want to achieve and then use their creativity and expertise to come up with ideas and concepts that align with your vision. A professional company will be able to craft a compelling narrative and develop a strong story arc that engages the viewer and delivers your message effectively. This includes the importance of structure, pacing, character development in telling a compelling story.  4- RELIABILITY One of the key elements you can expect when working with a professional video production company is reliability! This means you can trust the company to deliver the final product on time, to the highest quality, and on budget. One way that a company like Moxie Productions demonstrates their reliability is by a having proven track record of meeting deadlines. A professional company will understand the importance of completing projects on time and will work efficiently to ensure that your video is delivered as promised. Reliability also means that a company has a track record of satisfying clients. This means they have a history of delivering projects that meet or exceed their clients' expectations. As we all know, challenges and unexpected issues pop up with any project. A professional company will be able to handle any unexpected issue that may arise during the production process. They will also be able to anticipate and potential roadblocks and find creative solutions to keep the project on track.  Overall, when you work with a professional video production company, they will alleviate stress for you company when it comes to creating professional videos. With their clear and concise communication, their technical expertise, their creative skills and their proven reliability, you can be assured that you are in good hands. A professional video production company will have a range of fees for their services depending on the size of the project so before you think of getting your next door neighbour's cousin's friend to shoot your video, try contacting a professional video production company for a conversation.
 As technology continues to advance and evolve, video is becoming an increasingly important tool for medical education. Here are a four reasons why video is the future of medical education: 1- Video allows for a more engaging and interactive learning experience. Traditional methods of medical education, such as lectures and written materials, can be dry and unengaging. With video, educators can create interactive and engaging content that can help to capture the attention of learners and keep them engaged throughout the learning process. We recently worked with George Brown College School of Nursing to create Game Based scenario learning videos. The learner is the 'player' and is given options throughout the course to chose what next step should be taken. Each answer is supported by a video playing out that decision. The characters on the screen talk directly to the camera when addressing the 'learner' so that it has a very immersive feeling. (Image below is a screen grab from one of the scenarios.) 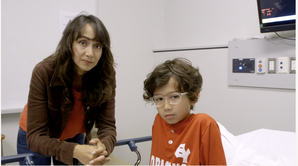 2- Video allows for the visualization of complex concepts. Many medical concepts are difficult to understand and visualize using written materials alone. With video, educators can use animations, 3D graphics, and other visual aids to help learners understand complex concepts and procedures in a more intuitive and interactive way.  3- Video is accessible and convenient. With the proliferation of smartphones and other mobile devices, video can be accessed anytime, anywhere. This makes it easy for learners to access medical education content on their own time and at their own pace, which can be especially useful for busy medical professionals who may not have time to attend traditional in-person classes. 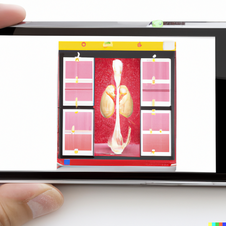 4- Video is scalable and cost-effective. With video, educators can reach a larger audience at a lower cost than with traditional methods of medical education. This makes it an attractive option for medical schools and other organizations looking to provide high-quality education to a wide audience without incurring significant costs.  Video is the future of medical education. With its ability to engage learners, visualize complex concepts, and provide convenient and cost-effective access to educational content, video has the potential to revolutionize the way that medical professionals learn and develop their skill.
86% of online advertisers use videos in their marketing efforts. Videos help consumers gain an understanding of a brands service or product as it drives traffic to your business' socials and website. SEO experts have calculated that Google's algorithm favours video content because videos primarily answer what visitors are searching for. 96% of consumers have watched an explainer video specifically to learn about a product or service.
To help you create engaging social media videos that people are going to watch and share, here are 4 tips we have found to be very helpful.
1-KEEP YOUR VIDEOS SHORT AND SWEET
Very few people are going to watch videos on social media if they last for more than 10 minutes (for explainer videos) and more than 1 minute (for promotional videos). That’s why it’s important to keep your videos snack size and entertaining while still providing value. What this means is that you need to edit and re-edit your videos keeping only the most relevant and engaging moments. Videos should capture attention, share a message, and have a call to action all in a short span of time. If you have a topic that requires more time, it's best to break up the video into smaller pieces. Sometimes you may have a long video sitting on your website. That video can be repurposed. A good editor can take that piece and break it up into smaller 30 second to 1 minute videos that you can then use on your socials to drive consumers back to the longer video and your website.
2-ENSURE THE FIRST FEW SECONDS REALLY STAND OUT
We are all keenly aware that our attention spans are not what they once were. In fact studies have shown that we lose attention in about8 seconds. That is why you need to engage them right off the bat. Start off with a powerful image, an engaging quote, a thought provoking question or captivating music. Try to include your logo, tag line, your product or service so that people will recognize you and have an understanding of what you are trying to communicate. You want people to be curious enough to stay watching. A good exercise is while you are on social media take note of those videos that made you keep watching and think about implementing some of their strategies.
3- IF THERE IS TALKING MAKE SURE TO USE SUBTITLES
Almost all social media platforms now automatically start or play a video without sound making including subtitles that much more important. Including subtitles will help get your message across, whether it’s on mute or not. People most often watch videos while doing something else or on the go. And almost always, they do so without sound. Even with the sound off, subtitles will allow you to capture your viewers’ attention and them not to miss what’s happening.
4- ENSURE YOU HAVE A GOOD STORY
Grabbing the audience's attention is very important but keeping them watching to the end is the ultimate goal. To do so, you must create high quality content that will make them want to stay around. Your video not only must look and sound great (see previous blogs about mics and lighting) it must also share a story that has a beginning, middle and satisfying end that has relevance to your target audience. The best videos have a story that creates a personal connection with the viewer and touches them emotionally. Think back to your favourite videos and how they made you feel. That's what you want to create for your viewers. This will help take your videos to a new level and raise your brand awareness.
Below is a GREAT example of a perfect social media video. It runs at 1 min 27 seconds. The first few seconds stand out as we wonder what this guy is up to. It doesn't use subtitles (easy enough to fix). And most importantly it has a beautiful story! It's just out but it will go viral!
 This image was created by an AI Photo Generating website https://creator.nightcafe.studio/ The future is upon us. AI (Artificial Intelligence) video generators are here and they are here to stay. Sites like SYNTHESIA, SYNTHESYS and ELAI are great creative tools that many people will find useful. They do have the potential to save you time and money as you can create your own promo videos without the need to hire a video production company or actors. The question you have to ask yourself is do you want to be spending your precious time creating videos yourself? You will still need to take time to write a creative script and generate the videos. Time that could be used focusing on your product or service. Just like any other creative tool there is a learning curve to using AI generators. The videos that can be created are restricted (as of Oct 2022) to one avatar speaking directly into the 'camera'. They can not walk around or interact with another avatar. Each of the sites we discuss do have monthly or yearly fees, which we do not get into. Please click on the links provided to get pricing information. This blog is just the tip of the iceberg when it comes to the world of AI generators. It's purpose is to introduce you to the concept of AI video generators, give you a few choices to check out and start you down the AI generator world! Although there are AI art, photo and music generators, in this article we will only be discussing the video generators. Moxie Productions is not affiliated with any of the companies mentioned in this blog. 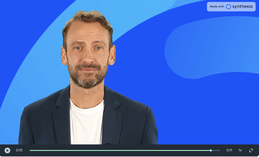 An AI avatar generated by SYNTHESIA SYNTHESIA is an AI video generator that turns written text into talking head videos. Synthesia offers a number of features including: over 70+ AI avatars, 65+ languages, 50+ video templates, background music, closed captioning and much more. They have templates for training videos, how to videos and product marketing videos. Your videos can be up to 30 minutes long. It's fairly easy to create the videos: Once you've logged in chose the type of video you want to create and your avatar, type in your script, chose your design and background, add in titles, background music and your logo. Two very cool features are that you can customize your avatar by uploading your own voice and image to use in the video instead of an AI generated avatar. Synthesia allows for a free trial without having to give any credit card information. SYNTHESYS breaks down their AI generators into AI Audio, AI video and AI avatars, and they price them individually and as a package. The AI audio allows you to generate human voices reading your script for radio commercials, podcasts or voice over for your digital content. The AI video allows you to create videos from your text. It's a fairly simple process: you chose the look and voice of your avatar, add your script, select the template for your video based on the type of video you are creating and then click go! Unlike Synthesia, Synthesys does not allow a free trial. ELAI works very much like Synthesia and Synthesys and like them, the video categories are: learning and development videos, marketing videos and corporate communications videos - all videos that require a 'talking head'. As like the other sites you get to chose the look and sound of your avatar, the language and the design of your video from a template. However, Elai allows you to generate your video from scratch. One fun option with Elai is the Cartoon Avatars. Elai does allow for free trial but only after giving your credit card information. |
B AndersonIs a playwright and screenwriter and founder of Moxie Productions Archives
February 2024
Categories |
 RSS Feed